Many WordPress themes require some specific elements in the menu items. A simple example is the Bootstrap 3 menu with specific dropdown elements. In this tutorial we will learn how to build your own WordPress custom menu with a Walker_Nav_Menu class.
Why Would You want a Custom Menu?
If you are a theme builder or you are even creating a custom solution, you would need a WordPress custom menu in several situations. Here are some of them:
- Show different menu items to visitors and logged-in users
- Add other elements requested in the navigation by frameworks (Bootstrap, Foundation, …)
- Include different information based on menu types (categories, pages, posts, tag, BuddyPress page, …)
These are only some of possible scenarios you could create your own WordPress custom menu walker.
Our WordPress Custom Menu
In this tutorial we will create a simple custom menu. Our menu will include the description of links and we will not create a link (a element) if there is no link to it. We will then create a span element.
We will do that using the theme Twenty Sixteen for styling purposes so that you can also try the code and the styling much easier. That is, if you are using the latest WordPress version.
We could use the Walker class that is being used for many items inside WordPress, but we would need to set some other parameters. By extending Walker_Nav_Menu all the default parameters are set from the beginning.
Base of our Custom Walker
This is just to start our walker. You can add this inside the functions.php file in the folder twentysixteen.
We are adding this before changing the theme’s header so that we do not get an error.
Changing the Twenty Sixteen Menu
To change the menu and add our own custom walker, open <code>header.php</code> and change this small part:
That’s it! We have added our walker and we can now start creating our own Custom WordPress Menu.
WordPress Custom Menu Item
The item is displayed by the static method start_el. This method accepts few parameters, some of them are self-explanatory, but two of them are hard to work with if we don’t know what they contain.
The two of them are $item and $args. The $output is a variable passed by reference. This means that it does not have to be returned. Everything that happens in this method to that variable will be available in the next iteration also.
The variable $item is an object that represents the an item of the menu. This is an example of a custom link:
Please take some time to read those values and understand them. Have some fun, change the menu items information and see what will change in there. For example, the title is the value that you will type in the Navigation label input.
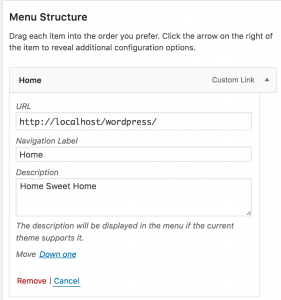
To make the Description label visible, you must scroll to the top and click on the Screen options. Once there, you need to check the Description to make it visible.
The variable $args contains every information we pass into the function wp_nav_menu. This can be used to enter some information from the arguments into our WordPress custom menu.
Preparing variables
Some of the information inside the $item object will be used in our custom menu. Let’s prepare them:
The variables that we will use here are actually $permalink, $title and $description.
Creating the Menu Item
We are now prepared to create our menu item. Use this code for that:
We will first create our li element with all the classes we have received from WordPress. This is done by using the PHP function implode.
After that, we are checking if there is a permalink. If the permalink only contains # then we are not considering it a link. For that case we will create a span element instead of a.
Once that is done, our output will get also the title of our item.
We are then checking if there is a description. If the variable $description is not empty and we are on the first level ($depth==0), we will add the description to the output.
At the end of our item, we are again having the same check for the permalink, but not for opening our element. We are doing it for closing the element.
Adding the Styles
Since we are working with the Twenty Sixteen theme, I have also created some styles for our non-link elements and for the description. Add this:
With that styles I have now this:

Want to learn more advanced topics? Check out my course by clicking on the image below.
Conclusion
Creating WordPress custom menu can be a daunting task if you are not aware of all the information that is available to you. There are menu walkers out there, probably for any framework you work with. The most important part I wanted for you to take from this tutorial is that you can control every part of each menu item.
This really can come in handy when working on some custom solutions or very specific themes.
Have you worked with some custom menus? Did you build your own menu walker or used one? Please do share that in the comments below:)
Become a Sponsor


Thank you for the tutorial. Is there a way to customize only those menus in a sidebar of a specific ID? I want to create a walker that only applies to Navigation Menu widgets in a specific sidebar.
Hi Red, you can use the filter ‘widget_nav_menu_args’ inside that widget to check on the sidebar probably. This filter can be found inside
wp-includes/widgets/class-wp-nav-menu-widget.php. The variable$argsshould contain every information about the sidebar. After that, you can easily change the$nav_menu_argsparam to add your own Navigation Walker 🙂Thank you for your time. $args does not store which sidebar a widget is stored in. $params lists sidebars, but I haven’t been smart enough to find a way to use them together. I need something like, “if this widget is in that sidebar, then use this walker, else use the default”
Here is information about $args where someone is trying to do something similar. I tried using a walker except on certain menu_id, but menu_id always comes up blank when following the directions here.
https://wordpress.stackexchange.com/questions/53950/add-a-custom-walker-to-a-menu-created-in-a-widget
It would be easier to change the default walker and then just use custom walkers in the registered areas. If I change the default using the code below, then my registered areas menus ignore their custom walkers and use the default one instead.
add_filter(‘wp_nav_menu_args’, ‘my_custom_walker’);
So i’ve been trying to create custom menu markup for my theme but the more i try the more i get frustrated! Pls anybody willing to help me?
This is the markup i want printed out;
Home
News
Anyway way i can do that? Thanks in advance!
I think I don’t understand the question. Can you use the menu Label field?
thanks for the info
how would this apply to a child theme structure?
The same way. If you’re doing a custom menu in your child theme, you could pass the walker directly into that function.
Thanks for this solution. But When I made custom navwalker as you did, I faced a problem that only one item is shown in menu. Can you help me for this?
Thanks for the tutorial. I have your tutorial up and running on my development server and all looks good. But would there be any chance the author could extend this tutorial here by showing how we could modify a nested list that is within an li element? for example, from within the walker go ahead and add an custom class to the sub list, or wrap that sub list in a div element.
It worked for me, thank you! (I’m developing a theme with Bulma.io)
Thanks for your very detailed post. I looked for something like that for months. I’ll check your blog to find more sweets like that one 🙂
Very useful tutorial. I’ve made a menu with images after reading this article.
Thank you for this!!!!!