
User experience is very important for your plugin. With WooCommerce Settings Pages, this experience might become worse with a lot of fields on one page. In this tutorial, you will learn how to create additional WooCommerce settings pages for your Payment Gateway.
I want this tutorial to be really focused, so I won’t go into developing a custom payment gateway. I’ll just use the existing PayPal gateway in WooCommerce and extend it with new fields and additional WooCommerce settings pages.
We will actually create two WooCommerce settings pages. The first one will be used for showing other fields and saving them. The second one will be used to show the orders done by our Payment Gateway.
Create an empty php file in the plugins folder, name it however you want and activate it through the dashboard.
Replacing the default PayPal Payment Gateway
Let’s replace it with our own. To do that, we will need to go through the registered payment gateways, remove the existing one and add our own.
We are using the filter woocommerce_payment_gateways to hook into all the registered gateways and remove the existing one. We are also making our own WC_Custom_PayPal as an extended class from WC_Gateway_Paypal. By doing this, we are retaining everything from the default class.
You could load the settings page now and it would work like nothing has happened.
Adding Buttons for Other WooCommerce Settings Pages
To add buttons that will link to other pages, we will create a custom field.
We are now redefining the method init_form_fields and inside that method we are calling the parent one. That will register all the default fields and then we will add our own field by merging the previous ones with our new array.
For now, if you load the PayPal settings page, you will just see a text input field. That is because we have not yet defined the HTML that we want for it. Let’s do that now.
By creating a method generate_screen_button_html we are defining the method for the custom field type screen_button. WooCommerce loads fields’ HTML by checking the type against existing methods. If there is no such method, it will load, by default, the HTML for the text input.
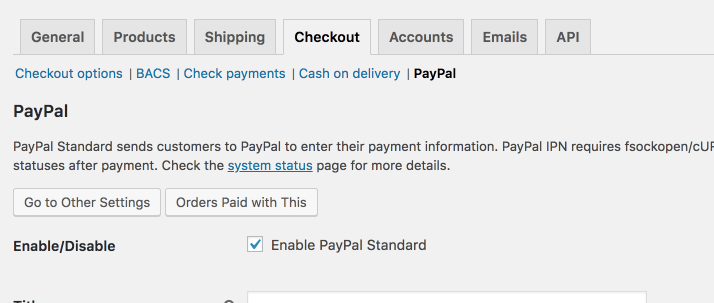
If you load the PayPal Settings Page, you should see those two buttons.
If you click on any of those buttons, you will get a new query string screen in the URL. For now, nothing will happen. You will still see the same default page.
Changing the WooCommerce Settings Page Output
To display different fields or other content, we need to redefine the method that is outputting the default settings fields. That method is admin_options. If you redefine it in our class, the output will change.
We check for the new query string first. If the query string screen is not present, we will call the parent admin_options so that it performs the default functionality and shows the default fields.
If there is a screen, we are then checking the content of it. If we are to display the orders, then we will process some custom HTML. By setting $hide_save_button to true, we will hide the submit button on that screen. We are retrieving the orders that are done only by this method. The custom HTML will be done at the end of this article.
If we are on the other screen, we will show the other settings by calling WC_Admin_Settings::output_fields(). Since we are using a custom method other_form_fields() to retrieve those fields, let’s create it.
Other Fields
To define other fields, we will create an array in the same way as the default fields.
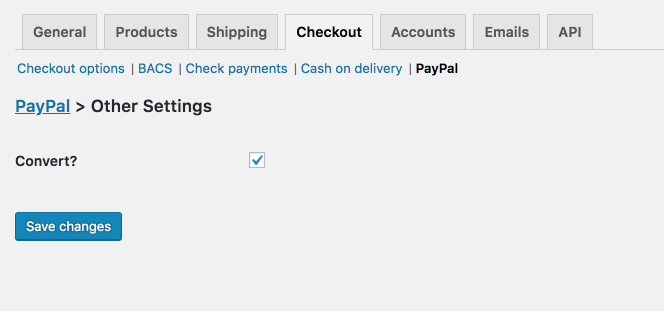
This is just a simple showcase on how you could define other fields, so you can learn how to do it. This particular setting won’t do a thing when processing payments. You can define whatever fields you need here.
Saving the Fields on the additional WooCommerce Settings Pages
If we don’t do anything now, WooCommerce, by default, will process the default fields because the method process_admin_options is set to process only the default fields.
If we are on the other page and try to save it, all the default settings will be RESET. They will reset because no data will be passed to the $_POST variable so each default form field will appear as empty.
We need to process only the other fields on our additional WooCommerce Settings Pages. So how to do that? By redefining the method process_admin_options.
In this example, we are checking if we are on a screen. If we are not, then we will process the default fields by calling the parent definition of our method. If we are on a screen, we will process the other form fields by calling WC_Admin_Settings::save_fields().
To be sure that your other fields are not reset, you can go a step further and define the specific screen to be used for saving the fields.
Showing Orders Paid WooCommerce Settings Page
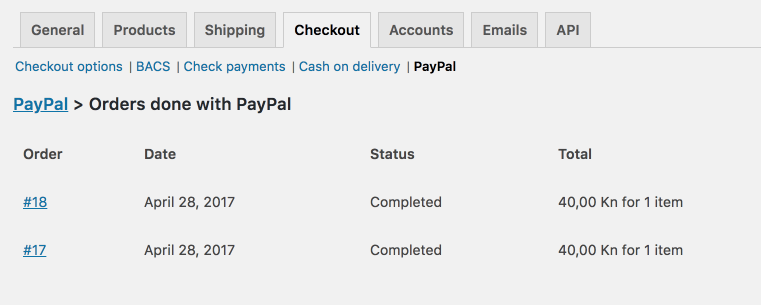
We will now go through all the orders that we got from the previous query inside the method admin_options.
For showing this orders, I’ve copied the template used in myacount/orders.php. I have stripped it down to just a table and I have removed the action column from that table.
You can use this to display even more data if you want.
Plugin Files
If you want the complete code, you can download it here and then do whatever you want with it:)
This part is available only to the members. If you want to become a member and support my work go to this link and subscribe: Become a Member
Conclusion
By using OOP and WooCommerce hooks, we can completely change how a default Payment Gateway operates. This can be also done for other settings pages.
Have you ever had to change a Gateway functionality? Would additional pages enhance the UX of your WooCommerce plugin? Tell us what you think in the comments below.
Become a Sponsor


Share this: