Starter Content is something introduced in WordPress 4.7. This is a feature that enables you to create the demo content for your theme from the beginning. In this tutorial you will get some insights in it and learn how to set it for your own WordPress theme.
Starter Content?
Before getting to know how to work with the start content, let’s first get to know what it is. The have a complete detailed description on it, how it works and all, I would advise you to read the WordPress Core introductory article.
The starter content will be used only on fresh installs. That means that if you have a site with some pages or posts, your site will not be affected by the starter content and thus it will not install new pages, posts or similar.
There is a ticket already for enabling the starter content on sites that are not fresh installs with a filter.
This content will also be imported and displayed when accessing Customizer. This way, your theme user can see how their theme could be like. If the user does not save and publish the changes, the live site will not be affected with the starter content. Pretty amazing, right?
Supporting Starter Content
For your theme to use the starter content, you need to tell the WordPress that your theme supports it like this:
You should add that in your theme setup function that is hooked in the action after_setup_theme.
You’re done!
I know. You don’t really believe it. But if you don’t set your own starter content, which we will look into later, WordPress will provide a default starter content.
You can check the starter content in a gist since it is a bit longer, but we will go through it now, so you will see some chunks on off it.
If you want to add your own content, then we would set a second parameter in the add_theme_support. This second parameter would be an associative array where keys represent a section of the content and the value would contain another list of associative arrays that would represent each individual content:
Content sections that we can set are:
- widgets
- attachments
- posts, pages or custom post types
- nav_menus
- options
- theme mods
Starter Widgets
To set widgets in starter content, we need to set which widget area to use (exp. sidebar-1) and then add an array of all the widget definitions. Here is an example of the Twenty Seventeen Theme:
If the list of attached widgets to a widget area contains only values and not a key=>value pair, then it will use a predefined widget. Let’s add a new text widget that will have a title Hello World and text Hello Widget inside the first sidebar, at first place:
Starter Post Types
We can set ‘dummy’ post types to show up in the customizer. Remember, if you want to use a custom post type, you must have them registered before. When supporting starter post types, you need to set a symbol, which is unquie. The array with definitions can consist of:
- post_type
- post_name
- post_title
- post_content
- template
- thumbnail
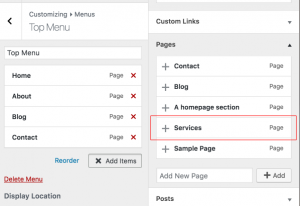
The only parts that you will see in the Customizer configuration are post_type and post_title. The post_title, template and thumbnail will be displayed on the right side where you can see how it would look like. Here is a combination of Twenty Seventeen settings and also a custom new page Services.
Other pages here are also defined in the default starter content and thus they don’t need to be defined once again.
If we refresh our Customizer (without saving), we will see this when building our menu:
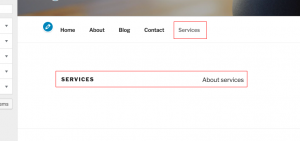
If we add that page to our menu, we would be able to navigate to it through Customizer:
In the code above you have also probably seen something in the brackets {{image-sandwich}}. This is a placeholder and it is different per each starter content. When used for posts in the parameter thumbnail, then it will look for a definition in section attachments to get an image where the key would have the same name.
Starter Attachments
Attachments can be used to add as media with other content and it can be used for attaching them as thumbnails. Here is an example of Twenty Seventeen:
As you can see, there is an attachment with the key image-sandwich. When setting attachments we need to specify a path to it inside the parameter file. This path can be relative and absolute. If you are going to set something like this inside a plugin, then you can specify an absolute path to that file with the help of the function plugin_dir_path. If you are having that file from a theme, then you can just set a relative path to the file and the folder inside your theme.
The attachments must reside in your WordPress folder, be it a plugin or theme. A file that is on a different domain or location can’t be used.
Starter Navigation Menus
The starter navigation menus can be used to create a navigation that would work with the theme. You can set everything you want and you can even use the starter post types that you have defined in the starter content.
You can see how a Twenty Seventeen has its navigation menus set and you can also see our custom page Services. By using the placeholder {{services}} we have told WordPress to check on the starter content, inside the section posts for a key services.
By using the starter navigation menus, our users won’t need to build their menus. We can do that for them, at least at the start.
Starter Options
The Starter options can help you set their site from the start. This can even be as simple as creating a new title for their site. As I have understood the whole process here, we are using the options that are registered for Customizer. I did not try doing anything outside of it. Since they have stated that the starter content is set only when Customizer has been opened, then this makes sense (to me).
You can also use placeholders in here. The placeholders here will represent a post type or an attachment. Here is a simple view of them:
The first three options are for setting what we will show as the homepage of our site and also which page will be used for posts. The fourth option is our custom option where we have set a new blog description. This setting blogdescription is used in the Settings > General part, but it has been also enabled inside Customizer.
Starter Theme Mods
We are down to the last one. This are the settings that are define for using the theme_mod functions. They are specifically targeted at a theme. This is definitely usable only inside a theme where the Customizer options have been set and registered.
You can also use a placeholder that will operate in the same way as it does for starter options.
The first four settings are set inside the Twenty Seventeen. Those panels are used on the front page. The page layout of Twenty Seventeen has two options One Column and Two Column. By default it is set as Two Column. That is why I have added my own starter setting for the page layout to be a One Column.
Creating Starter Content within Plugins
To set the starter content within Plugins, we need to use the filter get_theme_starter_content. I will no go into this much further. Here is an example provided from WordPress Core article on how to set a new widget with a plugin:
Conclusion
The starter content is a great new feature for theme developer but also for plugin developers because in both cases you can help your users by a lot. Many of them struggle at first when setting a WordPress site from scratch. This could help them get an idea on how to do something within WordPress.
Even though we have already a way to recommend other plugins within our plugin or theme, I think that Starter Plugins feature could also come in a near future.
Have you tried the Starter Content already?
Become a Sponsor
Hi,
Is this only works for Page?
Can we use on other post type?
Thanks
Hi Josiah, it should work for any custom post type. As you can see in the code examples there is an array key
post_type. In that key you can add any post type you want.Mine one of widget have used `wp_dropdown_pages` how can I select its showing empty 🙂
I am facing same problem right now…. Its really fraustating. 🙁
Hi Uzes, I have replied to Shiva. Can you check the answer and see if that will work for you?
Hi Shiva, sorry for such a late response. You should set the key of the instance you’re using to save the ID of wp_dropdown_pages. In the above example, you can see I have used the key ‘title’ to set the $instance[‘title’] in my widget.
For example, if you save that inside $instance[‘page’], then you should set that ‘page’ as a key and add the ID you want there.