WordPress Menu Pages are all those pages that you are using inside the WordPress admin area. If you have ever tried to add a menu page in WordPress admin area then you are aware of the work that needs to be done for various menu pages. In this tutorial we will create those menu page in a object oriented programming way.
This tutorial was inspired by Carl Alexander who teaches OOP in PHP and also tackles various situations in WordPress in the OOP way. You can read his tutorials and articles on his website https://carlalexander.ca/.
You can go straight forward and jump to examples to see what we will build: jump to examples.
How are we going to build it?
We will create classes WordPressMenu, WordPressSubMenu, WordPressMenuTab and WordPressSettings. WordPressSettings will be an abstract class that will be extended by WordPressMenu.
WordPressSubMenu will be extend the WordPressMenu to get all the basic logic from WordPressMenu and WordPressSettings. WordPressMenuTab is the class which is going to build tabs on menus.
The code that will be built here can be used in themes or plugins to easily create your own menus. Since WordPressSettings is the largest class of them all then I will leave that class definition at the end of the tutorial.
First, we are going to look at how others will be defined to provide an easy interface to build your menu pages.
Let’s get started!
WordPressMenu Class to add WordPress Menu
We will define the class first and also define a few attributes that are specific to this class.
Attribute $defaultOptions contains every option that can be set when creating our menu. By providing a set of options when constructing our menu from this class, we will merge that options with default options so that any option that is not provided, will be set from the default options.
Attribute $parent_id will be used to store the parent menu object. This will be used to create sub menus. And the last attribute is $menu_options which is used to store the merged options. This attribute is then used in every method that has to to use menu options.
In the __construct method we are merging the provided options with the default options and after they are merged we are checking if there is a slug in the options. If there is no slug provided, then we will not go further and we will not create the menu.
Once we are sure that the slug is set, we are setting our attribute settings_id (which will be set in WordPressSettings). This attribute will be used for storing our settings in the database. After that we are calling a method prepopulate to populate some of the options that are needed when creating our menus.
The last part of our __construct method are the hooks. The first hook is used to create the admin menus and we are hooking the method add_page. The second one is a custom action hook that we are going to define in the page of our menu. It is used to call the method save_settings that is used to save any set setting. This method is also a part of our WordPressSettings class.
Prepopulate our options!
Let’s define our method prepopulate to populate our menu options:
This is a really simple method. It will check if there is a title set and if not it will use the menu slug to create a title out of it. The second check is to see if there is a page title set and if not, then the title will be used.
Adding our page
Let’s now define our method add_page:
In this method we are first getting the function name from the menu options. If there is none, then we are setting the method create_menu_page which is used to render our fields, save the settings and also render our tabs. If the function is provided, then it will call a separate function to render it as a page of our menu.
The method also checks if the attribute $parent_id is set and if not it will create a parent menu page. If it is set, then it will create a sub menu.
Create our menu page
I have mentioned the method create_menu_page which is used to create our page, so it is now the time to create this method:
The first thing this method does is to check if our settings are submitted. We are also setting a default tab in the variable $tab. After that, we are checking if there is a tab specified by the global variable $_GET. If there is, then we are setting the tab to the provided tab.
The next part is initialising the settings so that we can use those settings when rendering fields. This method is also a part of WordPressSettings.
The only thing left now is to render our form and fields so we do that by creating a simple form and by calling methods render_fields, render_tabs and save_button. The first method is part of our WordPressSettings class. The method render_tabs is used to render the tabs registered to that menu. The third method is used to render the button with the appropriate attribute name.
Let’s now create the last three methods in this class: render_tabs, save_button and save_if_submit:
In the method render_tabs we are checking if there are more tabs registered than one. If there is only one tab then there is no need to render that only tab.
In the method save_button we are rendering the submit button with the attribute name created from the settings_id and the suffix _save. By doing that, we are ensuring that our action used for saving the settings will be called only when that menu page is submitted.
In the method save_if_submit we are checking if the submit button was posted (clicked) and then we are calling our hook to save the settings. If you remember, at the beginning of this class, we have added our method save_settings to this hook.
Now that our class for creating menu pages is complete we can move forward.
Creating a class for WordPress Sub Menus
In the previous class WordPressMenu we did some ground work to prepare us for creating sub menus. That was done by defining an attribute $parent_id and the method add_page where we are creating a sub menu page if the $parent_id is provided.
Since almost everything is already define we only need to make sure that when creating WordPress sub menus, our parent menu is provided:
Yep! That is everything we had to do. With this simple class which extended the WordPressMenu class, we have everything that we need. The only difference here is that we request a WordPressMenu object to be provided when creating WordPressSubMenu objects (menus). The __construct method is calling the __construct method from WordPressMenu and after everything has been set, we are setting the attribute $parent_id by using the parents’ settings_id which is the slug of the parent menu.
Creating a class to create tabs in WordPress Menus
The last thing before creating our abstract class WordPressSettings, we will create a class to easily add tabs to the menu and also fields for that tabs. This is only a really simple class that will only be used as a factory to register our fields and tabs.
Of course this is for real! I said it will be simple :). When constructing a tab with this class, we are setting the slug and the title for the tab. Once that is done we are also setting our menu to the attribute $menu and then we are adding this tab to that menu by calling the method from the menu add_tab (This method is also a part of WordPressSettings).
We have also created a method that will be used to add fields to that tab. We are calling the method add_field from our menu to add that field to the menu but we are also providing the slug of our tab so that our menu knows which field to show on which tab. The method add_field from our menu is also a part of WordPressSettings.
Now that everything is done here, we can finally go to our backbone of WordPressMenu and WordPressSubMenu classes: the class WordPressSettings.
WordPress Settings in a Class
We will now create an abstract class with methods and attributes that will be used in classes WordPressMenu and WordPressSubMenu. This one is the longest class definition so please bare with me on this one. We will start small and fill the class with new methods as we learn together.
We could have used the WordPress Settings API here to make this class smaller and easier to handle but for the purpose of this tutorial I want you to see how everything can be easily done also by yourself.
Here we have defined our attributes and the comments above each one are enough to understand what they do. Let’s focus now on the database part. We will create three methods, one to get all the settings from the database and fill the registered fields with values. Second one will be used to save the posted settings and the third will be used to get a particular settings by providing the name of that field. So add this next to our class:
Method init_settings()
This method gets our settings from the database that are saved under the key of our settings_id. After that we are traversing our registered fields and if there is a saved setting for each field, that field gets its default value updated. We update the default value because we will use that value when rendering fields.
Method save_settings()
We are fulfilling the attribute posted_data with the global variable $_POST so that we can use that attribute alongside other validation methods. We are also checking if we got the settings from the database and if not, we call our method init_settings(). After that we are again traversing through our registered fields and then we are calling dynamically the validation methods for each field type. Those validation methods will return the right value (we will define those methods later).
Method get_option()
By providing the name of the field, this method will return the value for that field. If there is a saved setting for that field, it will return that value. If there is no setting saved for the provided field name, we will return the default value for that field if set.
Now that we have learned how to save and retrieve settings, let’s define the validation methods that are called in the method save_settings().
Here we are validating each field by getting the value of that field using the method get_option(). If there is a posted value for that field, we will return the value for that field. Otherwise the value from the method get_option() will be returned. The only difference is with the checkbox where we do not need to check the value from the database because if that field is not posted then it is not set.
We can get our settings from the database and also save those settings to the database. We now need a method to register the fields. Since we are always checking for tabs when saving or retrieving field values, we will need also a method to add a tab. Add this code now:
Method add_field()
First we check if the field to add has an allowed type defined. If not we will not register that field. Since there can be fields without a type set because there is a default field type (text), we are checking the allowed field type only when there is a field type already defined in the provided array. The second parameter tab is used to save that field under a tab.
Method add_tab()
This method is really simple. If the array is set with the slug and title, the tab is registered for those settings.
Great job! You are still reading? Then it must be something right! We have almost everything that our class is needing. The last part is about rendering. Add this method to render fields:
This method is used to see if there are any registered fields. If there are none, we are displaying a message that there are no fields registered. If there are any fields, we are rendering the fields for the provided tab by dynamically calling rendering methods for the field type. Add this rendering methods as the last bits of the code for our class:
Usage Examples:
So now all our classes are defined. But how to use them? Here are a few examples:
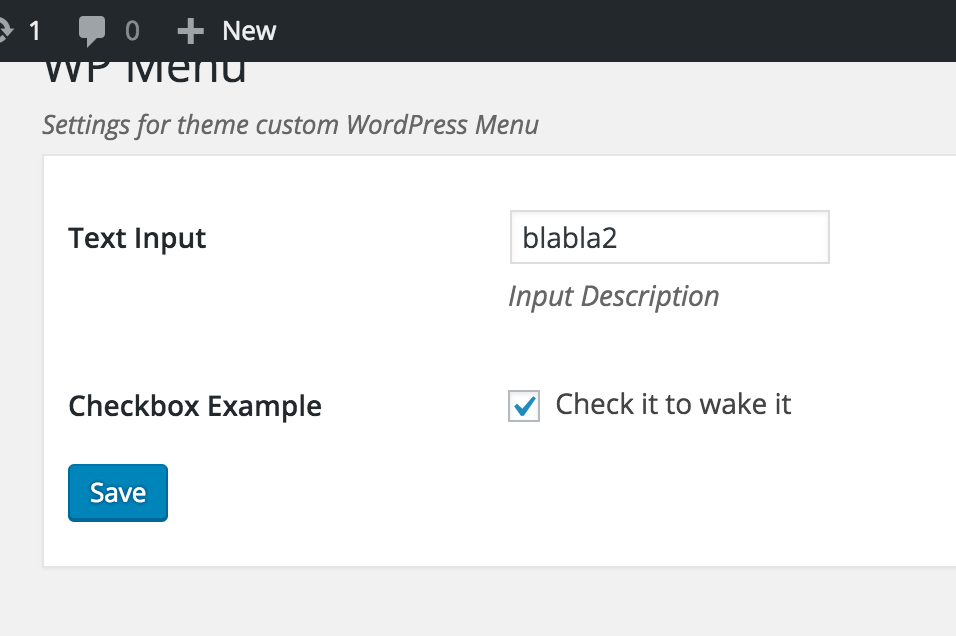
One menu with only one tab
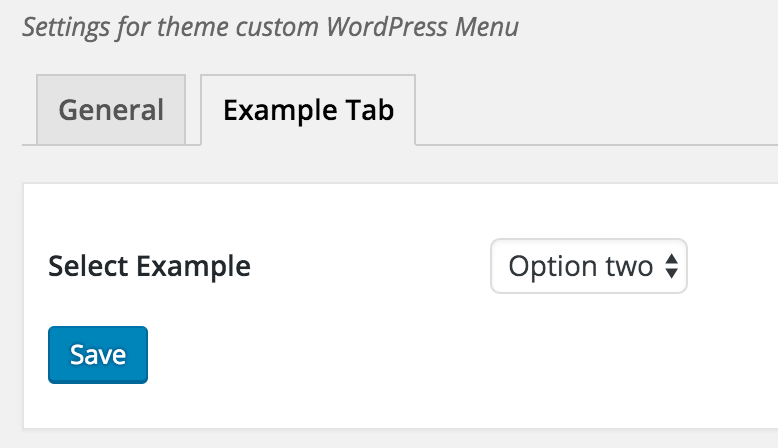
One menu with more tabs
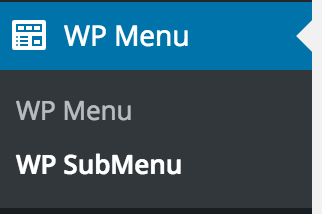
Menu with submenu
Conclusion
In these tutorial we have learned how to create menu pages in WordPress using OOP. OOP helps us decouple the code into several logical parts so that we can easily maintain the code and also change the code if needed.
Become a Sponsor

Very nice code. One issue I ran into is that it depends on wc_clean which from searching is woocommerce.
Hi Alonzo,
thank you for that. I have thought that I have removed it from the code. Now I did for sure:)
Thanks for your post, really well explained and clean.
Thank you for the tutorial. It is pretty cool that everyone is turning to OOP.
What if there is a need to add a direct submenu page, without a parent one? Let’s say under Settings?
Hi John, for adding a submenu page under the settings, you would need to change a bit the Menu/Submenu class to allow such thing.
You would need to allow creating submenu objects without passing the Menu object and passing the parent slug. And then if we’re passing the parent slug and not the Menu object, we then use a different function for adding the setting.
Very useful.
I have not done much with it yet, but, I have a couple of questions:
1) If I have multiple tabs, the first tab is named “General”, and I don’t see how to change this yet. What am I missing?
2) Data for multiple tabs, is all saved in a single array of values. Can this be changed, just using the available options?
I’ve also noticed, if a field name is changed (or field is removed) the old data value lingers in the array. I.E. when saving, it’s not limited to saving just the values in the metabox, but re-saves all old values in the old array too. I’m going to look into this, but it’s not a high priority.
Hi Thomas,
the General is set statically, but you could make it dynamically in the construct part when you create a menu. Maybe add a new field param
first_taband change the name of it. And then use that to replace the name in$tabs['general'].One menu page is saving all its settings to one array. Of course, you could change that so instead of having all the options set in one array, use the
update_optionfunction for each setting.If changing the field name, the old one won’t be changed since we are not checking the values. For that, if using in a plugin/theme, you would have to have an upgrade/update functionality that would delete old options and create new ones.
Thank your for this example Igor! I’m stuck on a issue with the checkboxes and multiple tabs.
e.g if I save a checkbox on tab 1, then checkboxes on tab 2 will assume the value of null (which removes my settings) because
$this->posted_data[ $key ]does not run for those tabs?I’m trying to seperate saving per tab, with no luck. Any direction to make checkboxes work across multiple tabs will be highly appreciated! 🙂
You could include a hidden input for the tab value or access the tab through
$_REQUEST['tab']. Then if you’re on the correct tab, validate those fields. For other fields, just let them be as they are without validating it. This should work out.You can check how I’ve dealt with it in one of my plugins: https://plugins.trac.wordpress.org/browser/giveasap/trunk/includes/abstracts/settings.php#L68
I am checking the current tab and skipping all other fields so they remain as they were before.
Thank you. Apart from learning much about using classes in WP, I have actually used this for theme settings and it is excellent.
I would like to add other page menus ( top level admin ) that store other data to custom tables. i.e. not settings to the options table, and want to keep using these classes.
I am considering the approach of splitting the settings class into two, so that methods to generate/validate form elements are separate to the read and update section.
So, have different ‘read/update’ classes e.g. settings, custome_one, custom_two … and these extend the form building stuff.
Do you think this is a good way of having the goodness of your page menu builder, and allowing to save different data to different tables? Or maybe there is a more simple way to repurpose ? Any advice appreciated.
Hi Josh, sorry for a late response.
You can create a new class by extending the menu class and then define the methods for saving/retrieving the data. By that you would have everything as before but the data would be saved/retrieved from a different source.
Nice class and nice tutorial but what is the point of declaring WordPressSettings as abstract whitout implementing abstract method?
So it is worth creating a normal class. I have read that you have referred to the articles of Carl Alexander but Carl explains very well why to use an abstract class.
Another thing. In the add_field() method you declare the array key ‘default’ twice. The second one overwrites the first one.
Bye
Hi Adriano,
thank you for letting me know about that 🙂 I’ll have to go through the Carl’s article once more 😀
Hi Igor and thanks for your reply.
I looking your tutorial from a higher level of abstraction and I realized that in reality the presence of an abstract class has no purpose.
You use the WordPressSettings class only to render controls, validate and create tabs and fields.
If I had to design a class like yours, I think of a different approach by defining in the abstract class the common methods (ex: initialization and adding fields and tabs) and minimum two abstract methods called render() and validate() to be defined in under classes that implement them.
This should give the package more flexibility.
Hi Adriano, thank you for your input. That could have been done like that also for sure. In my case, I’ve found this class useful for some of my projects since the classes I’ve created based on this had to redefine only 1 or 2 methods from it.
But I do see your point and understand it 🙂 One of the interesting ones to look at is also from WooCommerce and their abstract settings class.
From the point of view of the code I consider WooCommerce the worst that has ever been designed. Worst even than WordPress itself but I understand your point of view and also those that are your needs.
Igor I think your code is a good idea, useful and portable. But can you show an example of how to use the code in WP –? I am a long time programmer but new to WP.. Just showing an example of instantiating some of your classes does not explain where and how the code would be use to present menus and html pages in WP.
For example the below : Will not produce and html anywhere. Thank you. ..
$customWPMenu = new WordPressMenu( array(
‘slug’ => ‘wpmenu’,
‘title’ => ‘WP Menu’,
‘desc’ => ‘Settings for theme custom WordPress Menu’,
‘icon’ => ‘dashicons-welcome-widgets-menus’,
‘position’ => 99,
));
$customWPMenu->add_field(array(
‘name’ => ‘text’,
‘title’ => ‘Text Input’,
‘desc’ => ‘Input Description’ ));
$customWPMenu->add_field(array(
‘name’ => ‘checkbox’,
‘title’ => ‘Checkbox Example’,
‘desc’ => ‘Check it to wake it’,
‘type’ => ‘checkbox’));