ReactJS and the WordPress REST API is relatively new. Using the WordPress REST API we can easily create various interfaces that can be even remote and not connected directly to WordPress. With ReactJS we can connect to WordPress and create parts of our website pretty fast. In this tutorial we will create a WordPress widget to retrieve 5 random posts which people can like.
Since we are using WordPress REST API, we have to authorize every request that changes the data. Those requests are POST, PUT and DELETE. Our like feature is only possible for a signed-in user, which is also fine since we want to stop spammers from it.
Preparing
Before we start coding, we need to prepare everything, First, you will need to install the plugin WordPress REST API which is available through the WordPress plugin repository. Install it and activate.
We should also create our plugin’s folder react-posts and also the main file react-posts.php. For our plugin to be installable and activable, we need to enter the Plugin’s name. So let’s add this:
JavaScript will be the main focus here, but it will come later in the article. Now create our main JavaScript file react_posts.js. This file will contain everything for the ReactJS part.
The ReactJS
We also have to use ReactJS, so we need the scripts in our plugin. Create react.min.js and paste this:
We also need another script for ReactJS to work with the DOM. Create react-dom.min.js and paste this:
Now we are prepared to start coding:)
Enqueueing scripts for WordPress Widget
For our WordPress widget, we will use scripts and thus we have to enqueue them. We will enqueue 3 scripts that we have just created. Since our main JavaScript file react_posts.js will use jQuery, ReactJS and ReactJS DOM, we need to enqueue it after all those dependencies have enqueued.
Add this to our main plugin’s file:
The first thing we are doing here is checking if our WordPress Widget is active. If it is active, we will enqueue those scripts. We are registering our main JavaScript file but not enqueueing it immediately. Before enqueueing our main JavaScript file, we will register some local strings that will be available in our JavaScript code. They will be available in the form of an object that will be called wpReactPosts. The items available in this object are:
- root – url for our REST calls
- nonce – the security nonce to be used in our calls
Once we have registered our object, we are enqueueing the script. As you could see, we are calling a function rest_url(). This function will set the root REST URL on which we will create various requests.
Adding Style
I did not enqueue any style here, but you can do that if you want to. I will just add some simple CSS rules in the WordPress Header.
You can even add here the check which we added when enqueueing the scripts to make sure that our WordPress widget is active on the current page.
The WordPress Widget
Now we will create the whole WordPress widget and name it ReactPosts_Widget:
The base ID of our widget is react_posts_widget. This is the same ID we are using when checking if our widget is active.
In the method form we are enabling an input where we can insert a title for our widget. In the method widget we have the code that will be outputed when are widget is displayed. As you can see, we are just outputing the title and some arguments which are passed by the theme. The main HTML element in this code is the id="react_posts". We will use that ID to attach our ReactJS DOM.
The method update is used to save the title that is inserted in the input field. The last part of this code is registering the widget by using the action widgets_init. In the function that is passed to that action, we call the function register_widget and pass the class name to it.
Adding the Field Likes to each Post in REST API
The field like will be a value of how many people liked the post. We will have to add that field to each post we retrieve. That can be done using the WordPress REST API functions, actions and filters.
When we add a field, we can decide if that field can be read and updated. We will enable both requests.
Here we are adding a new field to the object type post. The field key is likes and that key will hold the value. We have also registered two functions. The value will be retrieved and saved from the post meta using WordPress functions get_post_meta and update_post_meta.
Function react_posts_get_likes is used to retrieve the value and add it to the field likes.
Function react_posts_save_likes is used to save the value to the field likes.
Now that we have registered our likes field, we can make requests on our site and create our widget using the data. It is time for ReactJS!
Understanding the WordPress Widget structure for ReactJS
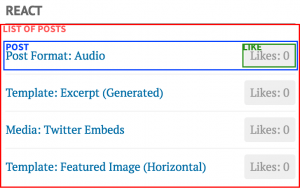
Our WordPress widget will be a list of posts that were randomly selected. Each post will have a link, title and a like button with the count of likes.
WordPress Widget React Structure
Our root element will be the list of posts. The list will contain an array of elements. Each of those elements will be a post. A post will contain a link to the post itself, title and the like button. The like button will be another element from ReactJS.
The like button will render the count. It will also have a method to save the like. This method will then call another method that was passed from the root element.
Why?
The root element will contain the state. Each time, a data changes in the state, ReactJS will render those elements or DOM that has changed. Since our button will get the count from the root element, we don’t have to set a state on the button.
To learn more about structuring your ReactJS elements and handling the state and re-rendering, I suggest you to read Thinking in React.
I will also use the plain JavaScript to create React Elements. We could use JSX for creating React elements to have an easier syntax, but that would mean you need to install Babel, set Gulp or similar. If you want to know more about that, I would suggest you to read Integrating React with gulp, written by Jonathan Suh.
Creating the Like button in React
I will take a different approach here and start from the bottom to the top. The first element we will create is the Like button. Add this code to our main JavaScript file react_posts.js.
Inside our React class we have created a new method setLike. This method will take the current count of likes and add a new one to the count. After that, we call the method saveLike that is passed in the properties props by our root element.
We pass the new count and the id of the post to this method.
In the render method we are creating a React element that will be a span element with a class react-posts-likes. We are also setting the onClick attribute to call the setLike method. The last thing we are adding in our React element is the inner HTML of our span element.
Creating the Post element in React
The post element is a li element that will have a link inside a element and the button which will be the React Like class.
In the render method inside the class PostsListItem we are getting the $post json object from the properties that we will send inside each PostsListItem.
Since WordPress REST API gives a json object for a post in a specific format, we can get the title by using post.title.rendered. We are here checking if it is empty. If that is the case, we will create our title from slug.
We are then creating a React element li to which we don’t send any properties (null), but we are then passing two React elements to render inside that li. The first one is an a element.
On that element, we are passing a href attribute that contains the link to that post and we are also setting the inside HTML to the title.
The second React element is the React Like class that we have created before.
Now when we can create our post items with the like buttons, we need the data and the root element that will render everything.
Creating the Post List element in React
This will be the most complex part of our tutorial. Let’s see the code first:
The first method is the getInitialState. This method will set the initial state to our React application.
The second method is the componentDidMount. This method will create an AJAX GET request to our URL. This URL resides under our previously registered object wpReactPosts (when we enqueued scripts, remember?). The URL value is under the key root.
We are also appending to the request URL wp/v2/posts. This is the request URL for posts. Using that URL we can easily create GET and POST request.
To get 5 random posts we are also passing some arguments:
per_page– sets the number of posts to getfilter– filter where we can set anything from WP_Query arguments
After we get the data from that request, we are setting it in the state by using the method setState.
If there is an error, you can set a great message for the user. I have used a simple console.error to log the error inside the console.
The next method is saveLike. Do you remember it from the Like button? If not, check it out how we have used it there. This method is accepting the count of likes and the ID for the post.
We are also creating a new AJAX request on the same URL. The only difference is that we are also appending the ID of the post. This will make sure that we are updating that one post. We are also now using the POST request.
The other data that we are sending on that request is the count of likes and a nonce. Because we have set the like argument that will be passed to that URL, our REST API field function react_posts_save_likes will be used to update the post meta.
Once we get the data from that request, we are first getting all the state data. After that, we are iterating through all the posts using the map function. In that function we are checking for the post ID. If the ID of that post is the same as the one we wanted to update, we are setting the retrieved data to that post object.
After we have set the new data we are also updating the state of our React application. This will ensure our React DOM to be re-rendered with the new data.
Since we are using a predefined REST API route v2/posts, we need to be logged in and have enough rights to save data. If we wanted to have others liking the posts without any credentials, we should have made a custom REST API route without any permissions.
In the render method, we are iterating through all the state data (posts). In that iteration, we are creating for each post a new PostListItem element. We are all setting two properties:
post– contains the post objectsaveLike– reference to our method for saving the likes
The post object in that properties is used inside the PostListItem element. The method saveLike is used inside the Like button element.
The last thing we do is returning an ul element that has an inner HTML built from an array of PostListItem elements.
Rendering the whole React DOM
We have created all the React elements and we now only need to render them.
We are checking if there is an element with the id set to react_posts. If there is one, we are creating the React DOM from the PostsList element and the react_posts element.
Conclusion
By using ReactJS we can creating simple and effective interfaces on our WordPress website. The ReactJS offers us a simple way of declaring new elements and attaching functionalities to them. With the modularity in mind ReactJS work really well with the modularity of WordPress.
Have you worked already with ReactJS in WordPress? If so, what are you thoughts about it? Please do share your knowledge in the comments below.
Become a Sponsor

Thanks man! Another practicle and simple to understand article. Now i know how to use reactJS with WP widgets if i want… Yeeeah 🙂
Here you are using ID document.getElementById(‘react_posts’) where all the posts will be binded. It works great for one widget area.
What if I want to place two recent posts in two widget area. It would replicate two HTML elements with same ID right?