
Elementor Widgets are a great way to build your landing pages when using Elementor. Mostly, widgets are done through PHP but if you need some of the functionality on the front end or for the user editing the page, you will need to use JavaScript.
In this tutorial, we will learn about all the methods you can use with their JavaScript widget model and check for examples of the same.
If you want to check the Elementor’s guide of using JavaScript in widgets, you can get it on their site.
Since their guide uses the ES6 classes, we will use that approach as well here. The recommendation is to transpile your code into ES5 to support most browsers using Babel.js or similar.
To enqueue the script, you can use your widget’s construct method in PHP:
<?php

class Widget_Class_Name extends Widget_Base {
  public function __construct($data = [], $args = null) {
    parent::__construct($data, $args);
    wp_register_script( 'script-handle', 'path/to/file.js', , '1.0.0', true );
  }
  public function get_script_depends() {
    return ;
  }
}
That file would contain the transpiled JavaScript file. The file with ES6 would then have a widget that is extending the base class.
class WidgetHandlerClass extends elementorModules.frontend.handlers.Base {}
And to register our own Widget class (in above example WidgetHandlerClass), we do this right below our class definition.
jQuery( window ).on( 'elementor/frontend/init', () => {
  const addHandler = ( $element ) => {
    elementorFrontend.elementsHandler.addHandler( WidgetHandlerClass, { $element, } );
  };
  elementorFrontend.hooks.addAction( 'frontend/element_ready/your-widget-name.default', addHandler );
});
The your-widget-name is the name that your PHP widget class returns in the method get_name().
Let’s now see what we have in the elementorModules.frontend.handlers.Base on which we extend our own JavaScript class.
Elementor JavaScript Base
To check the whole class (model) on the Elementor github, you can check the base.js.
Here are the methods and attributes that exist in the class:
$element– attribute,editorListeners– attribute,onElementChange– method; null by default,onEditSettingsChange– method; null by default,onGeneralSettingsChange– method; null by default,onPageSettingsChange– method; null by default,isEdit– true if we are in the editor,findElement– method,getUniqueHandlerID– method,initEditorListeners– method,getEditorListeners– method,addEditorListeners– method,removeEditorListeners– method,getElementType– method,getWidgetType– method,getID– method, returns unique ID of the element,getModelCID– method, returns unique Client ID,getElementSettings– method, returns custom defined settings,getEditSettings– method, returns the editor settings such aspanelwhen clicking on the various control sections,getCurrentDeviceSetting– method,onDestroy– method, called when we remove the element from the page.
Some of this methods and attributes you can use in your custom defined methods. Let’s go over a few of them, to get an idea of what is going on here.
$element
This attribute is the jQuery wrapper around the widget. You can use jQuery on it to find elements and manipulate the DOM of the widget or elements inside of the widget.
editorListeners
editorListeners attribute is an array of events that will trigger different methods on some changes. The default listeners are:
element:destroy– calls thedestroy()methodchange:your-widget-name– callsonElementChangemethodchange:editSettings– callsonEditSettingsChangemethodonPageSettingsChange– callsonPageSettingsChangemethodonGeneralSettingsChange– callsonGeneralSettingsChangemethod
If some of those methods do not exist, they won’t be called.
findElement
This will find a jQuery element inside of the main $element object.
getUniqueHandlerID
This will get a unique handler for ID which is used for handling events so those don’t get to be called more than once on the specific element (widget instance).
onElementChange
This method is the method you will have to define if you want to make different operations/changes on the widget if a setting has changed.
This method will pass a parameterName which is the registered setting (control) key.
Example of an Elementor Core widget Video
Let’s now go over the Elementor core widget Video.
The Video Widget code can be found here:
- PHP: https://github.com/elementor/elementor/blob/master/includes/widgets/video.php
- JavaScript: https://github.com/elementor/elementor/blob/master/assets/dev/js/frontend/handlers/video.js
The JavaScript handle is registered to video.default because the video is returned by get_name().
getDefaultElements() {

  const selectors = this.getSettings( 'selectors' );

  return {
    $imageOverlay: this.$element.find( selectors.imageOverlay,
    $video: this.$element.find( selectors.video ),
    $videoIframe: this.$element.find( selectors.videoIframe ),
  };

 }
When the widget is loaded, they will get the default selectors using jQuery. The class/id for each of those elements are defined within the getDefaultSettings method.
getDefaultSettings() {
 return {
   selectors: {
     imageOverlay: '.elementor-custom-embed-image-overlay',
     video: '.elementor-video',
     videoIframe: '.elementor-video-iframe',
   },
  };
 }
Then, inside of the method playVideo(), we can use the this.elements.$video to get the jQuery object for the video.
The Video JavaScript handler has the method onElementChange defined to listen for changes in the widget settings.
That method then listens for several changes such as:
lightbox_content_animation– it uses indexOf because the settings name will also have a suffix there because it is a responsive control,- checks if the
lightboxis enabled and if the settinglightboxchanges and we see that the lightbox has been disabled with it, then we hide the modal/popup, - otherwise, if the
aspect_ratiosetting changed and the lightbox is enabled, it will set the new aspect ratio on the lightbox.
On the lightbox_content_animation, Elementor uses the indexOf because there will be three different settings since it’s a response method. It will append _mobile, _table and _desktop.
The mentioned settings on JavaScript can be found as registered controls in PHP:
aspect_ratio: https://github.com/elementor/elementor/blob/master/includes/widgets/video.php#L581lightbox: https://github.com/elementor/elementor/blob/master/includes/widgets/video.php#L555lightbox_content_animation: https://github.com/elementor/elementor/blob/master/includes/widgets/video.php#L761
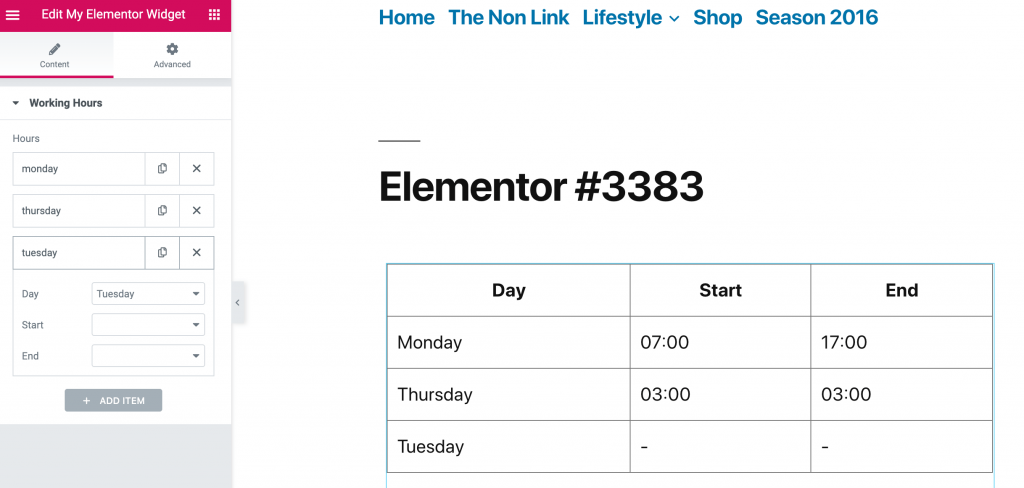
Custom Elementor Widget – Working Hours
Now that we have gone through the JavaScript part of Elementor Widgets, let’s create our own. We will create Working Hours widget where we will use JavaScript to reverse the rows when we click the days table head.
If you want to skip the code step and get the complete code, you can get it at the bottom.
Preparing the plugin
Create a new plugin folder elementor-widget (or however you want it). Then inside of it create a file elementor-widget.php, then create a folder src and inc. Inside of the folder src, create a JavaScript file index.js and inside of the inc folder create a file widget.php.
Be sure to have npm installed so that we can use it install @wordpress/scripts.
Then, with the terminal (command prompt) place yourself inside of the plugin folder and execute:
npm install @wordpress/scripts --save-dev
Then inside of the package.json file, if there are no scripts yet add:
"scripts": {"build": "wp-scripts build"}
Now, you can type npm run build and there will be a folder build created with the processed index.js. We can now start creating our widget.
Register our Elementor Widget
Add this to the elementor-widget.php file so we can register our widget.
We are hooking on the action elementor/widgets/widgets_registered that is called once all the core widgets have been registered.
Then we use the Elementor\Widgets_Manager object to register our own Elementor widget with the method register_widget_type().
Defining Elementor Widget
Let’s now define our My_Elementor_Widget. Put this in the inc/widget.php file.
In the constructor method, we register our script. Then inside of the method get_script_depends we define that this is a dependency for this widget. Then, when this widget is called, it will also enqueue our build/index.js file.
We have also define a custom method here get_days() to get the week days. Now, we need to define all the controls we will have for this widget.
Here we define a new section under which we will register a repeater control.
Afte that, we define three controls; day, start and end. We will then be able to define days and when the work starts and when it ends.
Let’s now render the widget.
We render the widget inside of the render() method. If we have any days defined, we show them with the start and end hours.
Ok, now let’s define our src/index.js file and build it.
JavaScript in our Elementor Widget
Open the src/index.js file and add this code:
That is the frontend handler for our widget. We named it MyElementorHandler.
We bind an event to reverse the rows when we click on the day head column.
Now we also need to hook it onto our widget.
Now in the terminal, while in the folder of the plugin, type npm run build.
If you now add your widget, add some working hours and try clicking on the Day column, you will see the rows being reversed.
Complete Code
If you want to skip all the steps and have the code ready, you can download the complete code here.
This part is available only to the members. If you want to become a member and support my work go to this link and subscribe: Become a Member
Conclusion
Elementor is a really powerful page builder and you can easily build your own widgets. They can be only PHP but you can also enhance the user experience with a little of JavaScript.
Have you tried building your own Elementor Widgets? Let us know in the comment about your experience and link what you have built.
Become a Sponsor
Thanks for your useful guide. Adding JavaScript proves effective to enhance user experience. I’m using Elementor on my WordPress site but have never built my own widgets. I will try to create one following your instructions.
Great Alice! I can also suggest you to look how other widgets are made (both Elementor default ones and from other Elementor add-ons). Much of them are not even using JavaScript so that’s a good starting point as well 🙂
Hello, I’m a newbie so I’m not understanding this guide, what I’m looking for is something that allow me to just paste my .js code in the elementor builder.
The whole code that is accessible for the premium members, will help me in that? I just need to put that code somewhere or is not the case?
Thanks!
Hi, this is not the code that you can paste in the Elementor Builder. This is a tutorial where you learn how you can use JS to build and enhance your own Elementor Widgets.
To paste your JS code in Elementor Builder, you can use the Elementor HTML widget and put your code inside of script tags.
Hello, you know so musch about Elementor. I run into one problem, i want by clicking on button reveal some Elementor’s sections, but when i do so the animation of that sections freezes and i need to resize browser to unfreeze them.
My code is very simple with jquery, hide() sections and then by click fadeIn(). Do you know what is the problem?
Hi Eugen, I don’t know what is the issue but I would recommend checking the console log and see if there are any errors there thrown by JavaScript.
I would assume that Elementor uses classes to show hide sections so that might be the reason?
Hey Igor! Thanks to this tutorial, you’ve helped me to begin grasping JS in Elementor Widgets.
I’m trying to build a content carousel widget using Tiny Slider JS. On the page, the widget works fine, of course, but in the Elementor Editor, the slider script can’t find the container element, which in my case is called #planner-recipe-carousel
Could I simply declare that container element in the frontend handler class, and then somehow Tiny Slider JS would find it and run as normal in the Editor, or is this much more complex?
Based on my new understanding of Elementor Widget JS, thanks to your tutorial, I’m assuming now that the Tiny Slider script wouldn’t even work in the Elementor Editor just out of the box like that, am I correct?
Thanks!
I figured it out, and then ended up switching to the native Swiper JS, which has a much more versatile API.
I initiated the carousel inside the handler and then it worked. It even worked for Tiny Slider, which I originally tried to use. To access the carousel instance outside of the handler class, I had to query the carousel instance into a variable.
Hi Rahu, correct. The slider might not be triggered correctly because the widget might load but the script to create the slider could be run before the widget is even loaded (in Elementor editor).
If you would use the same approach as I did here, in the place where I define
$hours(in JavaScript), you would define your selector which contains the slider. Then on bindEvents() or similar, you can initialize your slider and then the slider events will be also binded.Great tutorial thank you.
Do you know if there is a way to have listen for duplication event for the Repeater controls within a widget?
I am trying to modify a control value within the repeater field on duplication but I’m having trouble applying any sort of listeners within the panel to achieve this.
Thanks!
Hi Igor, thank you for this nice tutorial!
I’m looking for a method to trigger backbone widget script after ajax content load. I found the way by looking at the source code of elementor, but some pieces is missing.
Did you have a way to do it properly ?
Is it ok to have many classes in one single file or better to split them into a multiple files? But if it’s separated wouldn’t it effect loading speed?
Hi Aleksandr, I would advise you to place 1 class per file as it will be easier to maintain it all. You can then name the files similar to your classes.
With WordPress standards, you should name the file with lower case names, for example This_Is_My_Class would be class-this-is-my-class.php.
If you are following the PSR-4 standards, your class and file should have the same name, for example ThisIsMyClass would also be ThisIsMyClass.php.
great.
I wonder where should I put basic logic in the class? In your case you have a click event, but how to execute code when the widget is loaded? For example this code:
if ( 0 == $menu.length ) {
return;
}
let stretchElement = new elementorModules.frontend.tools.StretchElement({ element: $menu });
stretchElement.stretch();
Hi, you can do something like that yes. Check if such element exists in the DOM and then register the handler using the Elementor library.
Hi Igor,
I am working on creating custom carousel widget.I have successfully created the widget but I am facing issues in swiper js. I want to know how I can make swiper settings dynamic.For e.g if a user placed the widget 2 times on the same page but he need different setting for each widget.Can you please help me on this issue or you can share any article.
Thank you so much. I spent my morning to understand how it works and can finish my widget now. So happy.