WooCommerce is one of the most popular plugins for e-commerce in WordPress. Payment gateways are an important part of it to receive payments for your products or to even make refunds if needed. In this tutorial we will create a WooCommerce payment gateway for PayPal using their SDK for PayPal REST.
We will wrap our payment gateway as a plugin. You will learn how to create payments and also how to process the information you get back from PayPal. Let’s first create our plugin structure.
Create a folder inside wp-content/plugins and name it woo-paypal. Inside that folder create a new folder includes. That folder will contain our PayPal SDK. Create an main plugin file woo-paypal.php also in the folder woo-paypal.
PayPal SDK
Since we are using PHP for programming anything inside WordPress on the server side, we will have to use the PHP SDK. You can download it here: https://github.com/paypal/PayPal-PHP-SDK/releases. I have downloaded the PayPal-PHP-SDK-1.7.4.zip.
Copy everything inside the folder PayPal-PHP-SDK and paste them inside includes/paypal-sdk. That folder now should look similar to this:
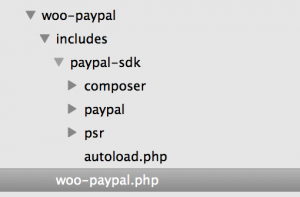
WooCommerce Payment Gateway Plugin
Our folder is prepared so now we can start coding (yey!). Open the woo-paypal.php and insert the first line which defines our plugin. The only mandatory is the plugin’s name so let’s add only that:
I also like to add some constants for easier development. Now we will create a constant and also hook a function that will create our WooCommerce payment gateway once all the plugins are loaded.
The constant WOO_PAYMENT_DIR will contain the path to our plugin so that we can easily include all other files such as the PayPal SDK. We will do that later in this tutorial.
We will define some namespaces that we will use from our PayPal SDK where all the classes reside, so add this also:
Payment Gateway
We need to create the function that we have hooked inside the plugins_loaded action, so let’s start. This is the base of our WooCommerce payment gateway:
The payment gateway Woo_PayPal_Gateway has been defined here by extending the WC_Payment_Gateway. At the end we are also adding our class to all the registered payment gateways using the WooCommerce filter woocommerce_payment_gateways.
Let’s start defining our Woo_PayPal_Gateway:
The variable $apiContext will contain the authorization that PayPal SDK requires for communicating with the PayPal REST API.
In the constructor method we are defining some basic data such as:
- ID – the unique id for our payment gateway
- method_title – Title used inside the WooCommerce settings
- method_description – Description used inside the WooCommerce settings
- title – Title used on the front side at the checkout page
We have also defined that we do not use fields for our payment gateway, because we will redirect our customer to the PayPal page to finish the payment. The payment gateway can also support various features:
- default_credit_card_form
- refunds
- products
Our payment gateway will be shown only on purchasing products on the checkout page so we are supporting only the products feature.
After that we are getting the PayPal SDK using the method get_paypal_sdk. We will create that method a little bit later.
To get our fields and also the settings for that fields, we have to initialize them. We do that with the init_form_fields and init_settings methods.
We have also hooked our check_response method to a custom action hook check_woopaypal. This action hook will be defined later on. The method check_response will check for our PayPal response after the customer has payed or cancelled their payment. Both actions will redirect the customer back to our website.
The last part of the constructor method is to hook a method for saving the settings in the admin area. That method is already defined in the WC_Payment_Gateway.
Getting the PayPal SDK
We have already mentioned and called our method get_paypal_sdk. Let’s define it now:
These is where we use our constant WOO_PAYMENT_DIR for including our PayPal SDK. By including the autoload.php, all our PayPal classes that we use will be called by the autoload.
Defining the Form Fields
Our form fields will be simple. One will be used to define if our payment gateway is enabled or disabled. The other two will be used for our the authorization part of our PayPal SDK.
The Client ID and the Client Secret are required by the PayPal SDK. I will show you how to get your client ID and secret at the end of this tutorial.
Processing the Payment
Once our customer clicks to Pay while the Woo Paypal is checked, our customer will be redirected to PayPal (if everything goes well). Before we redirect our customer we have to check if everything is ok and set all our products, shipping and taxes.
To communicate with PayPal, we need to have our $apiContext defined. This will be done using a method get_api_context:
Now we can easily get our API context and use it to communicate with the PayPal. Let’s now define our method process_payment:
I suppose you want to know what everything here is meant for, right? Let’s find out together!
First, we are getting the order object to the variable $order. We are also setting the $apiContext by calling the method get_api_context.
We are then creating a new Payer object in $payer and also assigning paypal as the payment method. The variable $all_items will contain all our Item objects for each product in our order. The variable $subtotal will contain the total subtotal from all our products.
We are then iterating over the items in the order and for each item we are creating a new Item object. If the item type is fee, we are setting the Fee item with its cost and also the quantity of 1.
If the item is a product, we are setting the Item object with all the product’s information such as the name, price, quantity and also the SKU if there is any.
Once our object is done, we are pushing it to the array $all_items.
After that the we are creating an ItemList with all the items in it. The object Details will contain all the information on the shipping, tax and subtotal. After that the object Amount will get the currency code, the total and the Details object.
This will make sure that the total is the same as the shipping + tax + subtotal.
Once that is done, we are creating a Transaction object where we set the Amount, ItemList with all the items and the invoice number.
We are also creating the $baseUrl using the order data. If the URL has a ? then we are setting a & at the end of the URL. Otherwise, the ? will be set.
Once our $baseUrl is done, we are creating the return URLs that PayPal will use for redirecting customers back to our website. We are setting a querystring woopaypal that will be an indicator that our customer has returned from our WooCommerce payment gateway.
The last thing is to create the payment using Payment. Once we create the payment, we can get the $approvalUrl where we want to redirect our customer. If everything was successful, we are returning an array with the approval URL. Otherwise we are creating a WooCommerce notice and returning an array with failure so that our customer does not get redirected.
Response from PayPal
After our customer completes the payment or cancels it, he/she will return to our website. We have to know what happened to our order, so let’s see how we can easily check if the customer has returned from our payment gateway.
In the constructor method we have used a new action hook check_woopaypal. At the bottom of our plugin’s file, add this code:
Here we are hooked to the action init. In the function check_for_woopaypal we are checking if there a woopaypal querystring. If there is, then we are starting all the payment gateways and also create a new action hook check_woopaypal.
Now our payment gateway is active and can call the method check_response. Let’s create that method in our Woo_PayPal_Gateway:
So, here we are getting the value of the querystring woopaypal and also from the querystring order_id which we have also passed. If the order id is equal to zero or none, we are stopping the response because we have no order.
We are also creating the $order with the order ID. If the order has the status completed or processing, we are stopping there since we don’t need to check the payment. We are checking this just in case our customer refreshes the page with the same querystrings in the URL.
Customer has payed
If the value of our $woopaypal is true, then the payment was completed. To be sure of that, we must check everything once again, so we are getting the $apiContext for the authorization part.
We are then getting the $paymentId and get the Payment from that ID and the $apiContext. Since we will have to execute the payment (so that PayPal knows that we got the customer back to our website), we are creating an object from PaymentExecution. We are here setting the PayerID. The objects Transaction, Details and Amount are the same as we used when processing the payment.
We are again iterating over all the order items just to get the subtotal value. The same steps we have used when processing the payment where we using here to set the shipping, tax, subtotal, total and currency information.
We are adding the transaction to the $execution object. After that we are executing the payment by passing the $execution object and the $apiContext.
If everything went well, we are completing the order by calling payment_complete method on the $order object. We are also adding a note on the order and also emptying the cart.
Otherwise, we are adding a WooCommerce notice and update the status of the order to failed.
Customer Cancelled
When a customer has cancelled the payment, we are getting the order and updating the status to cancelled.
Activate the Plugin! 🙂
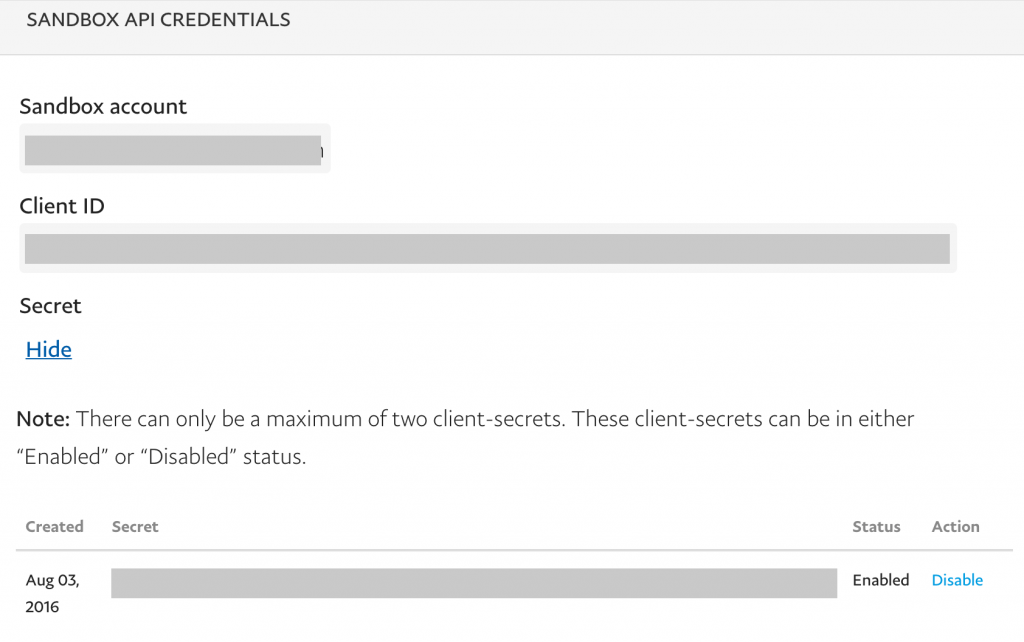
Getting the PayPal SDK Client ID & Secret
As I have said before, we are at the end of the tutorial and we will now see how to get the Client ID and Secret. Go to the Developer PayPal Site. Login with your account and go to the Dashboard.
Scroll down to the REST API Apps and click on Create an App. You have to have an account there to be able to use it for your App. If you don’t have one you can easily create on at Sandbox > Accounts.
Once you have created you App, click on it. You will see your client ID and secret. Copy them and paste them inside the WooCommerce > Settings > Checkout > Woo PayPal.
Conclusion
Creating your own WooCommerce Payment Gateway can be a lot of fun. But you really have to know how to use WordPress, WooCommerce and also your payment gateway. Once you know the workflow of your payment gateway, you can easily create the payment gateway you need.
This was a simple example of one. I do encourage you to look at other payment gateways you can find on WordPress.org plugins repository and study their code to see how to accomplish other things with the payment gateways for WooCommerce.
If you have any question regarding this payment gateway, feel free to post in the comments below!
If you want to know how to create a custom WooCommerce Shipping Method, you can learn that at my new course here. For more other specific WooCommerce tutorials, you can check out my eBook:

Become a Sponsor

Great Great Stuff. I’m running a marketplace website with several buyers. At the moment all the money from the buyers gets into my bank account and I have to transfer the money manually to the vendors. Is it possible to write a custom gateway for marketplaces. I’m using woocommerce and WC Vendors. If It’s possible please show me the way.
I have heard only about PayPal Mass pay which is what WC Vendors plugin should be able to process. For other gateways to be compatible and send the payment money in different accounts, they need to have a feature for that. I have never worked with marketplaces so I don’t have much information about that.
If you have a Facebook account, you can try and ask that in the ‘Advanced WooCommerce’ group: https://www.facebook.com/groups/advanced.woocommerce
Thanks Igor. Unfortunately we do not have paypal in my country. Let me cheqout the link. Cheers
Great stuff specially payment gateway method integrate with paypal so helpful for me. I have also read the article using authorizing payment method https://www.cloudways.com/blog/build-woocommerce-payment-gateway-plugin/
I am glad you liked the article.
Great in-depth article. And thank you Igor for sharing this. I have been reading up on developing a Payment Gateway Plugin for a few days and I am trying to understand the issue in depth. So if it’s not too much trouble, could you explain?
I have one question. Could we have used the WooCommerce API for server call back? instead of ‘init’ hook?
something like
add_action('woocommerce_api_' . strtolower(get_class($this)), array($this, 'check_for_woopaypal'));What is the difference and/or advantages in both approaches? Is it possible to use both in the same gateway? I have seen it in atleast one plugin. Here – https://wordpress.org/plugins/woocommerce-payu-paisa/
Hi Victor, that is a great question!
As far as I understand it, that action is called when doing a call with the querystring ‘wc-api’. So if we had something like
yoursite.com?wc-api=woopaypal, it will process the actionwoocommerce_api_woopaypal. We can then hook on that one and process it. I think that this approach is even a bit better performance-wise.To check the code where that action is being called, you can check the file
woocommerce/includes/class-wc-api.phpand then search for the methodhandle_api_requests.I was not actually aware of that part, so thank you for teaching me something new! 🙂
Hi Igor,
First, thank you tons for this. I spent two days trying to figure out why Paypal sales would not register in my WC site as completed. Everyone wanted to blame me, my theme, Godaddy’s hosting and Paypal’s sandbox (slow). Turned out to be Woocommerce’s Paypal gateway. Using this with some custom adjustments and it now works 100%. Thank you for saving my project and keeping me from having a really mad client!
Second, you left out one crucial part in this – converting from Sandbox mode to Live. I know it should be in here:
private function get_api_context(){
$client_id = $this->get_option(‘client_id’);
$client_secret = $this->get_option(‘client_secret’);
$this->apiContext = new ApiContext(new OAuthTokenCredential(
$client_id,
$client_secret
));
}
But I don’t know how to get ‘mode’ => ‘live’ into this mix. Could you explain that? At the moment, I have a “hacked” version of the Paypal SDK, where I changed the Sandbox mode links to Live links to connect to the write server, but that’s a poor-mans solution, and having it done right would be better.
Thanks again! Great piece of work and tutorial!
I got it sorted.
Follow the Credentials set with another application to the object, not added code to the first object call.
private function get_api_context(){
$client_id = $this->get_option(‘client_id’);
$client_secret = $this->get_option(‘client_secret’);
$this->apiContext = new ApiContext(new OAuthTokenCredential(
$client_id,
$client_secret
));
// ‘mode’ => ‘Sandbox’ for testing option
$this->apiContext->setConfig(
array(
‘mode’ => ‘live’,
)
);
} // end get_api_context()
Hi Mark, thank you for letting me know on that missing piece of code. I am really glad that this has helped you on your project. I thought that the apiContext itself would target live if the credentials are from the live mode but that was a bit silly now that I think of it;)
You could use the settings there and also create a radio option where you could choose to use sandbox or live mode and then based on that value you can set the mode to it.
Igor,
About the apiContext, I thought the exact same thing! The live and sandbox client keys are unique, so I figured the server router(r) would know which account and which mode. But I guess since the request goes directly to either Live or Sandbox servers, that the server will only have the credentials for it’s own accounts.
I was going to add two options today – a checkbox for Live/Sandbox mode, and a setter for the checkout button text. I am going to make this plugin a permanent part of my workflow for all future Woocommerce projects.
Great to hear that! Really happy that this tutorial has helped you! Wish you many great projects (and clients).
Two more things I’ve noticed – I hope I’m not being a pain here with too many comments!
This item:
$this->method_title = __( ‘Woo PayPal’, ‘woodev_payment’ );
The domain is wrong, the rest of the plugin uses ‘woo_paypal’ for the translation domain.
On my site, if a user goes to the Paypal page, then cancels the order, it is returning users to a page that says the order is paid. It’s registering correctly in WooCommerce as cancelled. I’m not sure if this is an issue that can be resolved with this plugin, or if it’s glitch in WooCommerce.
Hi Mark, maybe that could be done on the part inside the method
check_response. After the order status has been changed to cancelled, you could redirect them to a different page or even the checkout and applying a message for it. Just be sure to usewp_redirectandexit;together.Hi Igor,
Sorry for the super late response – been super busy with work.
I haven’t gotten a chance to debug this problem yet, but I will and I will post what I find here. The site I was working on is already in production, so this has become less of a hot-issue for me – again, thanks to you for saving me with this so I could get that site launched. I’ll be finishing this out as a plugin that I can use on any future projects, and I’ll post it on Github, appropriately giving you credit for the bulk of the work. I am going to change the name and variables, because I’m afraid that woo[anything] is too likely to conflict with another plugin down the road.
I still want to fix this cancel page issue, and also see if there’s a way to hack woocommerce from the outside so the standard Paypal gateway can be disconnected and remove confusion for the user. I tried deleting the gateway directory from my client’s site just to reduce the code bulk and also remove that gateway option, but the site went white-screen-of-death over it, so apparently that gateway is hard coded into the WC core.
I’ll keep you posted, and thanks again!
Hi Mark, thank you! To remove the default paypal gateway, you might want to check how they are adding that in the same way as we are adding this payment gateway. You will have to exclude that payment gateway through the filter by using
unset.You’re way ahead of me on that one! Cool, I will make a note of that and check that off the to-do list!
Hi igor,
Great post. I am actually looking for a solution like this. We don’t have paypal in pakistan and bank here don’t have any plugins for wordpress that can integrate with woo commerce. Moverover, there are no SDKs like PayPal that you can use.
Now the question is how to create a plugin that can send order id and payment amount on banks page where payment can be made and then make them return to our website without altering any functionality of woo-commerce?
Hi Suleman,
I am glad you like the post. To answer your question: Only if the bank has an option for that, then you could do it. Some banks or payment processors do have such thing where you send them such parameters, they then return a link or similar where you redirect your user. Once the user has completed it, the bank web app itself would return your visitor to your site with additional parameters which then you would check.
I did a simple google search and I found that 2Checkout supports Pakistan. Maybe you could try using that payment gateway to process your orders/payments? https://www.2checkout.com/global-payments
Got Http response code 400 when accessing https://api.sandbox.paypal.com/v1/payments/payment.
I have used all code for learning but it’s given this error
Hi igor..Did you missed 1 thing that is admin & customer will received notification email when new order created.
How to add the code so customer & admin will receive email notification everytime new order created?
Hi, that should be done automatically when we call payment_complete.
The order email should be sent even before the payment is completed.
I have successfully set up a custom payment gateway and it is loaded on checkout page. I am trying to redirect to a payment gateway when the “pay now” button is clicked. I am using this function but the redirect is not happening:
public function process_payment( $order_id ) {
$myObj->amount = 300;
$myObj->txref = “4e8e3561-622c-47aa-92e4-10abf8a02a72”;
$myObj->merId = “b2388c2c-b9bd-4974-b6a0-218efb77359b”;
$myObj->callback_url = “https://callback.url”;
$myObj->customerName = “Test”;
$myJSON = json_encode($myObj);
// echo $myJSON;
// Encode the string data into base64
$data = base64_encode($myJSON);
$redirectURL = add_query_arg( ‘req’, $data, ‘https://paywidget.staging.innovectives.com’ );
wp_redirect($redirectURL); exit;
}
How can i implement a redirect?
Your advice is much appreciated.
Hi Abdul, that would work if the form is submitted through a classic POST request but WC uses JavaScript and if it’s enabled (in most browsers/countries, it is), the checkout flow will use AJAX to try and process the payment.
The process payment method is expected to return an array actually. You can check how WooCommerce redirects with PayPal here: https://github.com/woocommerce/woocommerce/blob/master/includes/gateways/paypal/class-wc-gateway-paypal.php#L321, so basically, you would return an array with parameters ‘result’ => true and ‘redirect’ => your_rediect_url
Thank you. That works nicely:)
Hello Abdul,
Did you find any solution for this, I am trying to do the same thing. I need to redirect my customer to the payment server (with post data e.g. merchant id, access code, amount, transact ref) and still cant figure out the redirection process with POST data.
Hope someone give us a bright light on this. Am quite new so please. Sad
Hi Mary, please check how WooCommerce PayPal method does it on the URL I have posted above. The method needs to return an array telling WC to redirect them and then the customer will be redirected.
public function process_payment( $order_id ) {
$order = wc_get_order( $order_id );
$myObj->amount = ”;
$myObj->customerName = $order->get_billing_last_name().’ ‘.$order->get_billing_first_name();
$myObj->txref = $order->get_id();
$myObj->amount = $item->get_total();
$myObj->merId = “b2388c2c-b9bd-4974-b6a0-218efb77359b”;
$myObj->callback_url = “https://callback.url”;
$myJSON = json_encode($myObj);
// echo $myJSON;
// Encode the string data into base64
$data = base64_encode($myJSON);
$redirectURL = add_query_arg( ‘req’, $data, ‘https://mpayment-gateway-url.com’ );
return array(
‘result’ => ‘success’,
‘redirect’ => $redirectURL
);
}